Virtual Environments and pip: Python Project Management
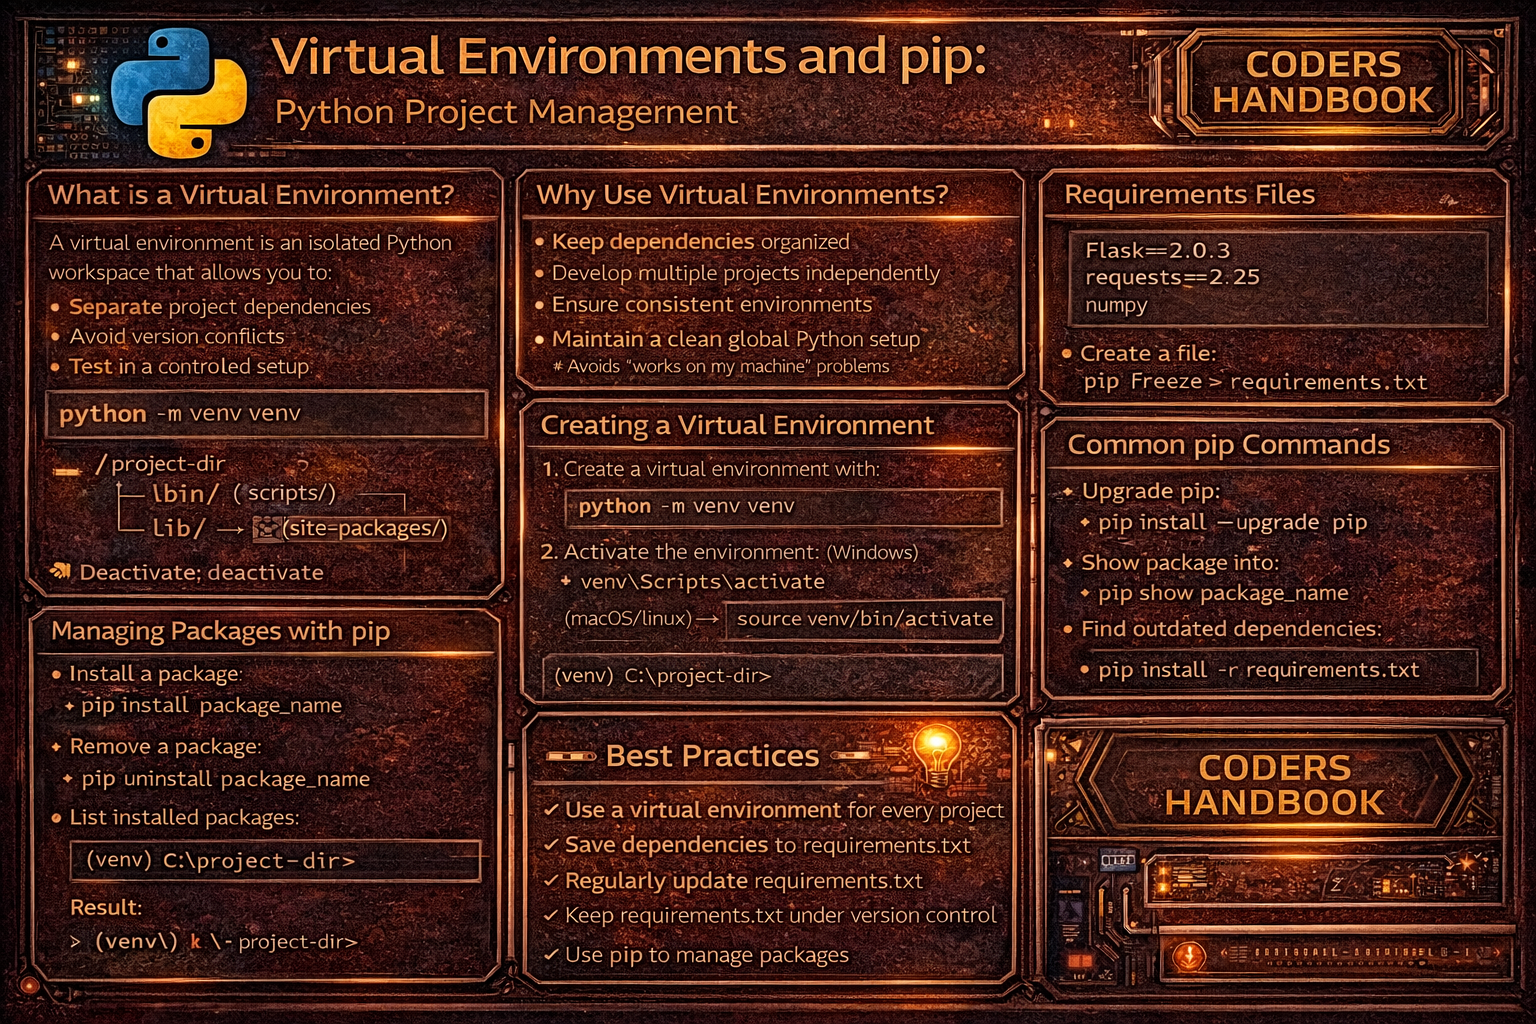
Virtual environments are isolated Python environments enabling each project to maintain its own dependencies independent of system-wide packages and other projects, preventing version conflicts when different applications require incompatible package versions. The venv module creates lightweight virtual environments containing their own Python interpreter copy and site-packages directory, allowing installation of project-specific packages without affecting the global Python installation or requiring administrator privileges. This isolation solves dependency hell where updating a package for one project breaks another, enables testing code against different package versions, simplifies deployment by documenting exact dependencies, and supports working on multiple projects simultaneously each with different dependency requirements without conflicts or contamination between project environments.
This comprehensive guide explores creating virtual environments with python -m venv for project isolation, activating and deactivating environments switching between isolated contexts, pip fundamentals for package installation and management, requirements.txt files documenting project dependencies with specific versions, pip freeze capturing installed packages for reproducibility, installing packages from requirements files recreating environments, best practices for dependency version pinning balancing stability versus updates, managing development versus production dependencies separating testing tools from runtime requirements, upgrading packages safely avoiding breaking changes, common workflows integrating virtual environments into development processes, troubleshooting activation issues and path conflicts, and advanced topics including environment variables, alternative tools like virtualenv and conda, and dependency resolution. Whether you're starting new projects requiring clean dependency isolation, collaborating on teams needing reproducible environments, deploying applications with precise dependency specifications, maintaining legacy projects with old package versions, or managing multiple Python versions, mastering virtual environments and pip provides essential tools for professional Python development ensuring clean, reproducible, conflict-free project dependency management.
Creating Virtual Environments
Creating virtual environments with venv establishes isolated Python installations for projects. The python -m venv command followed by a directory name creates a new environment containing a Python interpreter, pip package manager, and empty site-packages directory. Common practice names environments venv or env placing them in project root directories, with the created directory structure including activation scripts, Python executables, and package directories enabling complete dependency isolation.
# Creating Virtual Environments

# === Basic virtual environment creation ===

# Create virtual environment named 'venv'
# Command (all platforms):
python -m venv venv

# Alternative names:
python -m venv env
python -m venv .venv  # Hidden directory
python -m venv myproject_env

# === Directory structure created ===

# venv/
#   ├── bin/ (Linux/Mac) or Scripts/ (Windows)
#   │   ├── activate          # Activation script (Linux/Mac)
#   │   ├── activate.bat      # Activation script (Windows)
#   │   ├── python            # Python executable
#   │   └── pip               # pip executable
#   ├── include/              # C headers
#   ├── lib/                  # Installed packages
#   │   └── python3.x/
#   │       └── site-packages/  # Package directory
#   └── pyvenv.cfg            # Configuration file

# === Creating with specific Python version ===

# Use specific Python version
python3.9 -m venv venv
python3.11 -m venv venv

# On Windows:
py -3.9 -m venv venv
py -3.11 -m venv venv

# === Creation options ===

# Without pip (install manually later)
python -m venv venv --without-pip

# Allow access to system packages
python -m venv venv --system-site-packages

# Clear existing environment before creating
python -m venv venv --clear

# Upgrade environment's core packages
python -m venv venv --upgrade

# === Verifying creation ===

# Check directory was created
ls venv/          # Linux/Mac
dir venv\         # Windows

# Check Python version in environment
venv/bin/python --version      # Linux/Mac
venv\Scripts\python --version # Windowsvenv, env, or .venv as environment names. Add these to .gitignore - never commit virtual environments to version control.Activating and Deactivating
Activating virtual environments modifies the shell's PATH variable to prioritize the environment's Python and pip executables over system versions, ensuring package installations go to the project environment. Activation scripts differ by platform and shell, with Windows using activate.bat or Activate.ps1, and Unix systems using the activate script with source command. Deactivation returns to the system Python, with visual indicators like command prompt changes showing activation status.
# Activating and Deactivating Virtual Environments

# === Activation commands by platform ===

# Linux / Mac (bash/zsh)
source venv/bin/activate

# Alternative (same effect)
. venv/bin/activate

# Windows Command Prompt
venv\Scripts\activate.bat

# Windows PowerShell
venv\Scripts\Activate.ps1

# Windows Git Bash
source venv/Scripts/activate

# === After activation ===

# Prompt changes to show active environment:
# (venv) user@computer:~/project$
# (venv) C:\Users\Name\project>

# Python and pip now point to virtual environment:
which python      # Linux/Mac: /path/to/project/venv/bin/python
where python      # Windows: C:\path\to\project\venv\Scripts\python.exe

which pip         # Points to environment's pip
python --version  # Shows environment's Python version

# === Verifying activation ===

# Check Python location
python -c "import sys; print(sys.prefix)"
# Should show path to venv directory

# Check pip location
pip --version
# Should show path to venv/lib/pythonX.X/site-packages

# List installed packages (should be minimal)
pip list
# Output:
# Package    Version
# ---------- -------
# pip        X.X.X
# setuptools X.X.X

# === Deactivation ===

# Deactivate (all platforms, once activated)
deactivate

# Prompt returns to normal:
# user@computer:~/project$
# C:\Users\Name\project>

# Python and pip return to system versions
which python      # /usr/bin/python (system)
where python      # C:\Python3X\python.exe (system)

# === PowerShell execution policy issues ===

# If PowerShell blocks activation script:
# Error: cannot be loaded because running scripts is disabled

# Solution 1: Set execution policy for current user
Set-ExecutionPolicy -ExecutionPolicy RemoteSigned -Scope CurrentUser

# Solution 2: Bypass for current session only
PowerShell -ExecutionPolicy Bypass

# Then activate:
venv\Scripts\Activate.ps1

# === Common mistakes ===

# Wrong: Running activation script directly (won't work)
python venv/bin/activate  # Doesn't activate!

# Correct: Source the script
source venv/bin/activate

# Wrong: Trying to activate from wrong directory
cd venv
source bin/activate  # Works, but not recommended

# Correct: Activate from project root
cd /path/to/project
source venv/bin/activateSet-ExecutionPolicy -ExecutionPolicy RemoteSigned -Scope CurrentUser once to enable scripts.Package Management with pip
pip is Python's package installer managing package downloads from PyPI (Python Package Index), installations into site-packages directories, dependency resolution ensuring compatible versions, and package removal. Within activated virtual environments, pip installs packages locally to the environment's site-packages, leaving system Python and other environments unchanged. Understanding pip commands for installation, upgrading, removal, and listing packages enables effective dependency management throughout development lifecycles.
# Package Management with pip

# === Installing packages ===

# Install latest version
pip install requests
pip install numpy
pip install django

# Install specific version
pip install requests==2.28.1
pip install numpy==1.24.3

# Install minimum version
pip install requests>=2.28.0

# Install version range
pip install "requests>=2.28.0,<3.0.0"

# Install multiple packages
pip install requests numpy pandas

# === Listing installed packages ===

# List all packages
pip list
# Output:
# Package    Version
# ---------- -------
# certifi    2023.7.22
# charset... 3.2.0
# requests   2.31.0

# Show only user-installed packages (not dependencies)
pip list --not-required

# Show outdated packages
pip list --outdated
# Output:
# Package    Version   Latest    Type
# ---------- --------- --------- -----
# requests   2.28.0    2.31.0    wheel

# === Package information ===

# Show package details
pip show requests
# Output:
# Name: requests
# Version: 2.31.0
# Summary: Python HTTP for Humans.
# Home-page: https://requests.readthedocs.io
# Author: Kenneth Reitz
# License: Apache 2.0
# Location: /path/to/venv/lib/python3.x/site-packages
# Requires: charset-normalizer, idna, urllib3, certifi
# Required-by:

# Show multiple packages
pip show requests numpy pandas

# === Upgrading packages ===

# Upgrade to latest version
pip install --upgrade requests
pip install -U requests  # Short form

# Upgrade pip itself
pip install --upgrade pip

# Upgrade all outdated packages (no built-in command)
# Use this command:
pip list --outdated --format=freeze | cut -d = -f 1 | xargs -n1 pip install -U

# === Uninstalling packages ===

# Uninstall single package
pip uninstall requests

# Uninstall without confirmation prompt
pip uninstall -y requests

# Uninstall multiple packages
pip uninstall requests numpy pandas

# === Installing from different sources ===

# Install from GitHub
pip install git+https://github.com/user/repo.git

# Install from specific branch
pip install git+https://github.com/user/repo.git@branch-name

# Install from local directory
pip install /path/to/package

# Install in editable mode (development)
pip install -e /path/to/package

# === Searching packages (deprecated) ===

# Note: pip search was disabled in 2021
# Use https://pypi.org for searching

# === Downloading packages without installing ===

# Download package and dependencies
pip download requests -d ./packages

# Install from downloaded packages (offline)
pip install --no-index --find-links=./packages requests

# === Checking for issues ===

# Verify installed packages have compatible dependencies
pip check
# Output:
# No broken requirements found.
# Or:
# requests 2.28.0 has requirement urllib3<1.27,>=1.21.1, but you have urllib3 2.0.0.

# === Pip configuration ===

# Show pip configuration
pip config list

# Set configuration value
pip config set global.timeout 60

# === Using pip programmatically (not recommended) ===

# Deprecated - use subprocess instead:
import subprocess
import sys

subprocess.check_call([sys.executable, "-m", "pip", "install", "requests"])
Managing Dependencies with requirements.txt
The requirements.txt file documents project dependencies listing packages and versions needed to run the application, enabling reproducible environments across different machines and deployments. The pip freeze command captures currently installed packages with exact versions, while pip install -r requirements.txt recreates environments from requirement files. This approach ensures team members, CI/CD systems, and production servers use identical dependency versions, preventing bugs from version mismatches and providing clear documentation of project dependencies.
# Managing Dependencies with requirements.txt

# === Creating requirements.txt ===

# Freeze all installed packages with exact versions
pip freeze > requirements.txt

# Contents of requirements.txt:
# certifi==2023.7.22
# charset-normalizer==3.2.0
# idna==3.4
# requests==2.31.0
# urllib3==2.0.4

# === Installing from requirements.txt ===

# Install all packages from file
pip install -r requirements.txt

# Install with upgrade flag
pip install -r requirements.txt --upgrade

# === Different requirement formats ===

# Exact version (recommended for production)
requests==2.31.0

# Minimum version
requests>=2.28.0

# Version range
requests>=2.28.0,<3.0.0

# Compatible release (allows patch updates)
requests~=2.31.0  # Equivalent to >=2.31.0,<2.32.0

# Latest version (not recommended)
requests

# === Multiple requirement files ===

# requirements.txt (production dependencies)
# django==4.2.0
# psycopg2==2.9.6
# gunicorn==20.1.0

# requirements_dev.txt (development dependencies)
# -r requirements.txt  # Include production requirements
# pytest==7.4.0
# black==23.7.0
# flake8==6.0.0
# ipython==8.14.0

# requirements_test.txt (testing dependencies)
# -r requirements.txt
# pytest==7.4.0
# pytest-cov==4.1.0
# pytest-django==4.5.2

# Install development requirements
pip install -r requirements_dev.txt

# === Comments and structure ===

# Example structured requirements.txt:
# Web Framework
django==4.2.0
djangorestframework==3.14.0

# Database
psycopg2-binary==2.9.6

# API & HTTP
requests==2.31.0
urllib3==2.0.4

# Utilities
python-dotenv==1.0.0
celery==5.3.1

# === Installing from URLs ===

# Git repository
git+https://github.com/user/[email protected]#egg=package-name

# Specific branch
git+https://github.com/user/repo.git@main#egg=package-name

# Tarball or wheel
https://example.com/packages/mypackage-1.0.tar.gz

# Local package
./packages/mypackage-1.0.tar.gz

# Editable package (development mode)
-e git+https://github.com/user/repo.git#egg=package-name
-e /path/to/local/package

# === Hash verification (security) ===

# Generate requirements with hashes
pip freeze --all > requirements.txt
pip hash requests==2.31.0 >> requirements.txt

# Requirements with hashes:
requests==2.31.0 \
    --hash=sha256:58cd2187c01e70e6e26505bca751777aa9f2ee0b7f4300988b709f44e013003f

# Install verifying hashes
pip install --require-hashes -r requirements.txt

# === Updating dependencies ===

# Update single package
pip install --upgrade requests
pip freeze | grep requests >> requirements.txt

# Better: use pip-tools (install separately)
pip install pip-tools

# Create requirements.in (high-level dependencies)
# django
# requests
# celery

# Generate requirements.txt with all dependencies
pip-compile requirements.in

# Update all dependencies
pip-compile --upgrade requirements.in

# === Excluding packages ===

# Generate requirements excluding certain packages
pip freeze | grep -v "pkg-resources" > requirements.txt

# === Best practices example ===

# requirements/base.txt (shared dependencies)
django==4.2.0
celery==5.3.1
requests==2.31.0

# requirements/production.txt
-r base.txt
gunicorn==20.1.0
psycopg2==2.9.6

# requirements/development.txt
-r base.txt
pytest==7.4.0
black==23.7.0
django-debug-toolbar==4.1.0== in requirements.txt. Use pip freeze to capture exact versions ensuring reproducible deployments.Common Workflows
Effective virtual environment workflows integrate environment creation, activation, dependency management, and version control practices into development processes. Standard workflows include creating environments for new projects, installing dependencies from requirements files for existing projects, updating requirements when adding packages, separating development and production dependencies, and properly configuring .gitignore to exclude environment directories from version control while including requirement files for reproducibility.
# Common Virtual Environment Workflows

# === Starting a new project ===

# 1. Create project directory
mkdir myproject
cd myproject

# 2. Create virtual environment
python -m venv venv

# 3. Activate environment
source venv/bin/activate  # Linux/Mac
venv\Scripts\activate     # Windows

# 4. Upgrade pip
pip install --upgrade pip

# 5. Install packages
pip install django requests pytest

# 6. Create requirements.txt
pip freeze > requirements.txt

# 7. Create .gitignore
echo "venv/" >> .gitignore
echo "*.pyc" >> .gitignore
echo "__pycache__/" >> .gitignore
echo ".env" >> .gitignore

# 8. Initialize git repository
git init
git add .
git commit -m "Initial commit"

# === Cloning existing project ===

# 1. Clone repository
git clone https://github.com/user/project.git
cd project

# 2. Create virtual environment
python -m venv venv

# 3. Activate environment
source venv/bin/activate

# 4. Install dependencies
pip install -r requirements.txt

# 5. Run project
python manage.py runserver  # Django example

# === Adding new dependency ===

# 1. Ensure environment is activated
source venv/bin/activate

# 2. Install new package
pip install pandas

# 3. Update requirements.txt
pip freeze > requirements.txt

# 4. Commit changes
git add requirements.txt
git commit -m "Add pandas dependency"

# === Updating dependencies ===

# 1. Check for outdated packages
pip list --outdated

# 2. Update specific package
pip install --upgrade requests

# 3. Test application
pytest

# 4. If tests pass, update requirements
pip freeze > requirements.txt

# 5. Commit
git add requirements.txt
git commit -m "Update requests to 2.31.0"

# === Clean environment recreation ===

# 1. Deactivate current environment
deactivate

# 2. Delete old environment
rm -rf venv  # Linux/Mac
rmdir /s venv  # Windows

# 3. Create fresh environment
python -m venv venv

# 4. Activate
source venv/bin/activate

# 5. Install from requirements
pip install -r requirements.txt

# === Development vs Production ===

# Development setup
python -m venv venv
source venv/bin/activate
pip install -r requirements_dev.txt

# Production setup
python -m venv venv
source venv/bin/activate
pip install -r requirements.txt

# === Using with Docker ===

# Dockerfile example
# FROM python:3.11-slim
# WORKDIR /app
# COPY requirements.txt .
# RUN pip install --no-cache-dir -r requirements.txt
# COPY . .
# CMD ["python", "app.py"]

# === Using with CI/CD (GitHub Actions example) ===

# .github/workflows/test.yml
# name: Tests
# on: [push, pull_request]
# jobs:
#   test:
#     runs-on: ubuntu-latest
#     steps:
#       - uses: actions/checkout@v2
#       - uses: actions/setup-python@v2
#         with:
#           python-version: '3.11'
#       - name: Install dependencies
#         run: |
#           python -m venv venv
#           source venv/bin/activate
#           pip install -r requirements_test.txt
#       - name: Run tests
#         run: |
#           source venv/bin/activate
#           pytest

# === Sharing environment across team ===

# 1. Create requirements.txt with exact versions
pip freeze > requirements.txt

# 2. Document Python version
python --version > .python-version
# Or use runtime.txt for deployment platforms
echo "python-3.11.4" > runtime.txt

# 3. Add setup instructions to README.md
cat << EOF > README.md
# Project Setup

## Prerequisites
- Python 3.11.4

## Installation
1. Create virtual environment: \`python -m venv venv\`
2. Activate environment: \`source venv/bin/activate\`
3. Install dependencies: \`pip install -r requirements.txt\`

## Running
\`python app.py\`
EOF
Best Practices
- One environment per project: Create a separate virtual environment for every project. Never share environments between projects to avoid dependency conflicts
- Add venv to .gitignore: Never commit virtual environment directories to version control. They're large, platform-specific, and reproducible from requirements.txt
- Pin exact versions for production: Use
pip freezeto lock exact versions in requirements.txt ensuring reproducible deployments and avoiding surprise breaking changes - Document Python version: Record required Python version in README, runtime.txt, or .python-version file ensuring team members and deployment systems use compatible versions
- Separate dev/prod dependencies: Maintain separate requirements files for development (testing tools, linters) and production (runtime dependencies only)
- Upgrade pip first: After creating virtual environments, immediately run
pip install --upgrade pipto get latest pip version with bug fixes and features - Use requirements.txt early: Create requirements.txt from project start, updating with
pip freezewhenever dependencies change for continuous documentation - Test after dependency updates: Always run tests after upgrading packages to catch breaking changes before committing updated requirements
- Activate before installing: Always activate virtual environment before installing packages. Verify with
which pythonorwhere python - Consider pip-tools or Poetry: For complex projects, use pip-tools for reproducible builds or Poetry for comprehensive dependency and packaging management
pip install.Conclusion
Virtual environments provide essential project isolation in Python enabling each application to maintain independent dependencies without conflicts through the venv module creating lightweight environments containing their own Python interpreter copies and site-packages directories. Creating environments with python -m venv establishes isolated installations commonly named venv or env, with activation scripts modifying PATH variables to prioritize environment executables ensuring package operations affect only the project environment. Activation differs by platform using source venv/bin/activate on Unix systems, venv\Scripts\activate.bat on Windows Command Prompt, and venv\Scripts\Activate.ps1 on PowerShell, with visual prompt changes indicating active environments and deactivate command returning to system Python.
Package management with pip within virtual environments installs packages using pip install, upgrades with --upgrade flag, removes with pip uninstall, and lists installed packages with pip list, maintaining environment-specific installations separate from system Python and other projects. The requirements.txt file documents project dependencies with package names and version specifiers, created via pip freeze capturing exact installed versions or manually with desired version constraints, enabling reproducible environment recreation through pip install -r requirements.txt across development machines, CI/CD systems, and production deployments. Common workflows integrate environment creation at project start, dependency installation from requirements files when cloning repositories, requirement updates when adding packages, separation of development and production dependencies through multiple requirement files, and proper .gitignore configuration excluding environment directories while including requirement files. Best practices emphasize creating one environment per project avoiding dependency conflicts, adding venv to .gitignore never committing platform-specific environments, pinning exact versions for production using pip freeze, documenting Python versions in runtime files, separating development dependencies including testing tools from production runtime requirements, upgrading pip immediately after environment creation, maintaining requirements.txt from project start updating continuously, testing after dependency upgrades catching breaking changes, activating environments before installing verifying with which or where commands, and considering advanced tools like pip-tools or Poetry for complex dependency management. By mastering virtual environment creation isolating projects, activation switching between environments, pip package management, requirements.txt dependency documentation, common workflows integrating environments into development, and best practices ensuring reproducible deployments, you gain essential tools for professional Python development preventing dependency hell, enabling team collaboration with consistent environments, supporting multiple project versions simultaneously, and deploying applications with precise dependency specifications across diverse platforms and deployment targets.
$ share --platform
$ cat /comments/ (0)
$ cat /comments/
// No comments found. Be the first!